Xubuntu users who are currently asked to sign in manually can additionally edit a specific text file to gain automatic access to their computer. Make sure to set a good password anyway, since Xubuntu hashes out the root account such as standard Ubuntu does and makes the primary user an administrator. You’ll still need this password when using sudo, gksu and the F1-F6 virtual consoles.
Method 1: Using the Users and Groups Settings
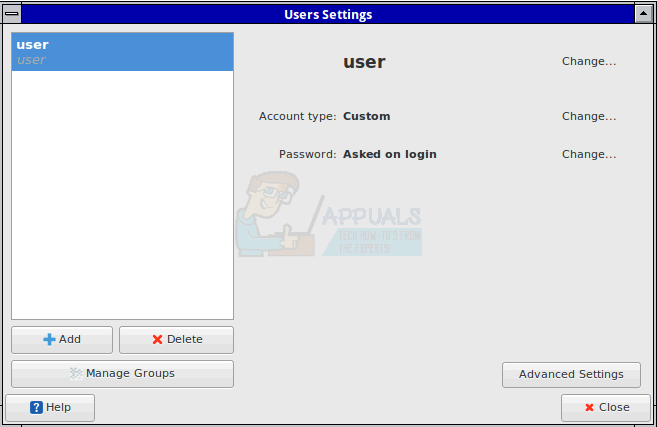
Select “Users and Groups” from either the Xfce4 Applications menu or the Whisker Menu. Push the enter key if you highlighted it, or single click it on the Whisker Menu slide.
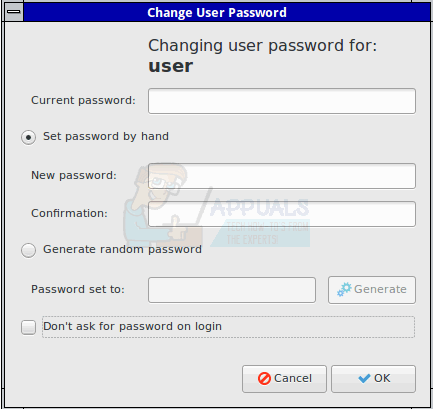
Click on the Change button next to the setting that reads “Password: Asked on login,” and then make sure that the “Don’t ask for password on login” checkbox has a mark in it. Finally, select the OK button to approve your changes.
If the checkbox is indeed currently unchecked, then Xubuntu will probably ask you to enter your password. Select the Close button in the User Settings window and restart your computer to make sure that the changes stuck. Should you find that they haven’t stuck after you rebooted your computer, then you’ll want to repeat these steps and then move onto Method 2 before restarting again. You’ll also want to move on to Method 2 before restarting a second time if you find that the changes have indeed stuck but you’re still not able to log into Xubuntu automatically without being prompted for a user name or password.
Keep in mind that while this process removes the need to type a password, it doesn’t actually disable the login screen. If you didn’t disable it when you installed Xubuntu, then you’ll still need to edit a configuration file. Even if you do both of these, if you were to ever manually log out of Xfce4 instead of rebooting or shutting the machine down, then you’ll have to graphically log yourself in again. This won’t undo your changes, though, so you’ll still have an automatic logon when you restart the next time. You may find that your machine will still boot into the graphical logon screen, but you won’t have to enter a password. Light DM might merely want you to push enter or click on a button to enter. If this is the case, then you’ve solved half the problem and still need to use the techniques in Method 2 to enable the automatic process. If you don’t have this problem, then you’ve more than likely corrected everything already and don’t need to move on.
Method 2: Editing the lightdm.conf File
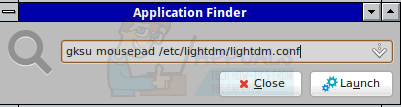
Hold down the Super or Windows key and push R at the same time to bring up the Application Finder. Type gksu and push enter. You’ll be prompted to enter your password to continue. You could also issue this command from the terminal if you wished. If you prefer to work with a terminal instead of default mousepad text editor that Xubuntu gives you, then you can issue the command sudo nano from the terminal and enter your password.
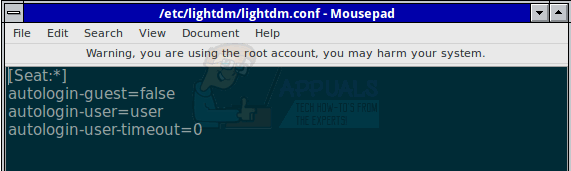
In either case, you will generally only have one segment of the file, which starts with the [Seat:] block. If you have more than one block, then find the block that looks like that and add a line that reads autologin-user=userName, replacing userName with your actual user name. If you had a user merely named user on your system, then you might end up with a file that looks as such: [Seat:] autologin-guest=false autologin-user=user autologin-user-timeout=0
You do want to make sure that autologin-guest is set to false and not true in any case. Save the file and then close your text editor before restarting Xubuntu. If you were using mousepad, then you can push CTRL and S at the same time to save the file. GNU nano users should hold down CTRL and hit O to do the same. If you receive a warning telling you that you’re operating as the root user in mousepad, then it’s safe to ignore this so long as you only edit this specific file. The gksu command gives you the authority to operate as the superuser, and you don’t want to do this for a particularly long time by any means. Make sure you don’t open any other files with your text editor while making these edits. While this works in the most recent versions of Xubuntu up to those that use the 16.04.1 LTS Ubuntu core, older versions of Xubuntu used a slightly different configuration system. If you’re unable to find the file, then replace that directory location with
and see if that loads correctly. If that’s the case, then you’ll find a block that reads: [SeatDefaults] user-session=xubuntu Edit the file so that it reads: [SeatDefaults] user-session=xubuntu autologin-user=userName Once more, be sure to replace userName with the actual desired user name on your system. If you have multiple users configured on your Xubuntu installation, then you can have one of them set to automatically logon, but this is really not recommended since it defeats the purpose of multiple users in the first place. If you do find that your Light DM configuration file is located at , then you’ll want to run Software Update since this probably means that you’re running an older version of Xubuntu. It’s quite possible that Canonical actually no longer supports your version anyway, which means that it’s time to update.
Ubuntu 18.04 LTS Bionic Beaver Officially Available for Ubuntu, Kubuntu,…How to Run xset Commands at Startup in XubuntuHow to Install Compiz on XubuntuFix: Failed to Login Bad Login Tekkit