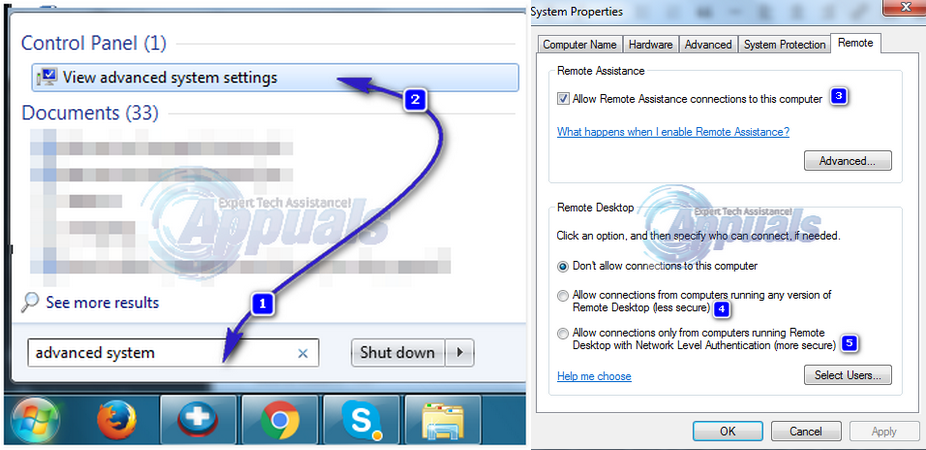
By default, RDP uses the port 3389 which can be a security risk because vulnerability scanners are set to scan default ports to exploit vulnerabilities, imaging that a vulnerability for RDP comes out, and you have system running RDP hosting sensitive data (such as medical records); a hacker may be able to exploit it and gain access using the default port. Therefore, i highly recommend changing RDP Port once it’s setup. Windows has limited the use and setup of RDP to their professional versions only, which means Home, Starter, and Basic versions of Windows will not be able to setup RDP. The aim of this guide is to help you setup RDP on versions where Windows limits them. To enable Remote Desktop where available, you can go to Control Panel -> System -> Advanced System Settings -> and Click on the Remote tab.
There’s a small bit to understand here, which can leave you scratching your head in trying to troubleshoot RDP if it’s not setup correctly, at the initial stage and that is Authentication. When setting up RDP, you have two choices under the Remote Desktop option, they are “Allow connections from computers running any version of Remote Desktop” and “Allow connections only from computers running Remote Desktop with Network Level Authentication“, if the computer you are enabling RDP on is the same version from where you will connect, then you choose the second option, which is the Network Level Authentication, otherwise, you will need to choose the first option which is to allow connections from any version of Remote Desktop because of the way windows treats authentication protocols. Now coming back to the objective of this guide and as discussed earlier, the Remote Desktop option is limited to Professional versions and above, but there is a patcher known as Concurrent RDP Patcher which serves two purposes, allowing concurrent connections and enabling RDP in the versions where it is not available. Concurrent RDP Patcher was released at The Green Buttons forum which is the official Windows Media Center Community forum.
Method 1: Using the W7-SP1-RTM-RDP
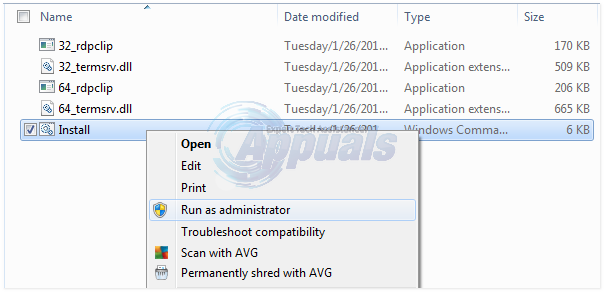
Download W7-SP1-RTM-RDP from here. Open the downloaded folder and extract it to your desktop. In it there will be a file named Install.cmd. Right click on it and click Run as Administrator. Click Yes to User Account Control warning message.
Command Prompt will launch, and execute the instructions in the file. Once done, follow the steps above to Enable RDP. If this method doesn’t work, then try Method 2.
Method 2: Concurrent RDP Patcher
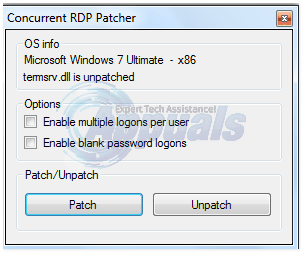
Download the Concurrent RDP Patcher from here. Extract the downloaded file, and execute Concurrent RDP Patcher file. Click the Patch button. Once done, you should be able to enable RDP and also be able to allow concurrent connections to it.
An update by Windows KB3003743 was released, which reverts the changes made by RDP Patcher. If this is the case, then follow Method 3 to make the patch work.
Method 3: Undo KB3003743
A Microsoft update KB3003743 was released on 11 November 2011 which reverts changes made by the above patcher, leaving RDP Disabled. To undo these changes, we will use an update patch made specifically for fixing it. Download the updated patcher from here. Open the downloaded folder and Double click on Concurrent RDP Patcher to run it. Click the Patch button. This will revert changes made by the update to disable RDP Patcher.
How to Allow Standard User to RDP/Remote Access on Windows 7 and 10How to Setup RDP on Windows 10 (All Versions)Fix: RDP not Working after Update 1709Fix: RDP ‘Remote Desktop’ Black Boxes/Bars and Screen Size issue