This is due to the Windows 10 installer not having the appropriate software to update a GRUB menu, since Microsoft has its own proprietary boot loading system that’s not compatible with Linux. While it’s possible to install an implementation of Ubuntu inside of Windows 10, you’ll need to do something else entirely if you want to dual-boot in the same manner as before. As long as your Ubuntu partition wasn’t touched during the installation, boot Windows 10 like normal and open the Control Panel. You need to open the classic Windows Control Panel, and not the modern implementation. You can then proceed with the method that suits your needs better.
Method 1: Using the Graphical Boot Repair Suite
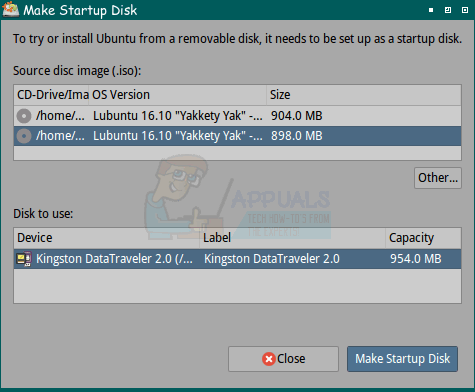
Some users find that they can’t access the Windows Control Panel, but instead only the modern one. This is also a problem in Windows 8.1 as well as the deprecated Windows 8. You can open a command prompt as an administrator if you have difficulties with this, and then type control and push the enter key. In any case, select the Energy Settings icon and then click on “Show Hidden Settings,” which will probably prompt you for approval. Once you have, uncheck Fast Boot and click on the OK button. Close the Control Panel and the command prompt. You’ll need to create a boot drive on a USB memory stick or an SD card to start your machine up the same way you did when you first installed Ubuntu or the other spin of Ubuntu that you’re using. You can start the USB boot disk creator from the Ubuntu Dash menu or by using usb-creator-gtk from the command line if you’re running Lubuntu or Xubuntu. You’ll need an image from the official site to create a bootable drive, though you might also with to use the dd command in order to do so.
You may want to try a piece of software called Rufus if you have no way to create a bootable drive because you totally lack access to a machine running Linux. Make sure to download it from a safe site, like http://www.softpedia.com/get/System/Boot-Manager-Disk/Rufus.shtml or its official download page at https://rufus.akeo.ie/ since there are other programs that masquerade as it. Once you have it started, you can load the ISO to it and write to blank media. Remember that anything you have on said media will be erased in the process.
Assuming that you’ve been able to boot into an Ubuntu or an Ubuntu spin live environment, try using these commands from the terminal, pushing the enter key after each one. This will force Ubuntu to correctly index the Boot Repair repositories and then install the software along with it. You’ll need to have a working network connection in order for this to happen. As soon as the Boot Repair software installation finishes, the program will start. You’ll have several options to choose from, but click on the “Recommended Repair” setting to let the program go to work. Once it’s completed you can reboot from your main boot volume and you should see the GRUB menu once more giving you the option of what OS you’d like to start from. sudo apt-get update sudo apt-get install -y boot-repair && boot-repair
Method 2: Using the Windows and Linux Command Lines
Just like in the first method you’ll have to disable Windows Fast Boot before you can proceed, however once you’ve closed the Control Panel you want to keep your administrator’s command prompt open. You need to disable hibernation in order for this to work, so from the Windows MS-DOS-style command line, type: You more than likely won’t see much output if any, but you can shutdown afterwards. It may be smart to use shutdown -s -t 00 from the command line to shutdown your machine. Microsoft has, for better or worse, redefined what shutting down a Windows PC is.
Boot from the removable install media you’ve made, and then open up a terminal from the Dash. You can also hold down Ctrl, Alt and T to do the same. Owners of machines using a legacy BIOS boot mode with MBR partitioning on their hard disk should use sudo mount /dev/sd*# /mnt, replacing the * with the correct letter and the # with the number of the system partition GRUB is on. You may find that its sda1 or sda2 in many cases. Once you’ve done so, use sudo GRUB-install –boot-directory=/mnt/boot /dev/sd* with the same replacements. Users of UEFI boot technology have a slightly more difficult situation. From the terminal, they’ll still need to mount the system partition, but UEFI systems also have an EFI partition, which needs to be mounted with: In the case of /dev/sd*, this should just be the disk letter assignment and not the volume number. You’ll probably need to use /dev/sda. MBR partition table layouts should have GRUB installed on the same disk where Windows is installed while those with GPT table layouts need GRUB in the EFI partition. You can always use GParted or the Disks Utility to find the correct drive and volume assignments, or you can alternatively use sudo fdisk -l from the command line. for i in /dev /dev/pts /proc /sys /run; do sudo mount -B $i /mnt$i; done sudo chroot /mnt GRUB-install /dev/sd* update-GRUB
Ubuntu 18.04 LTS Bionic Beaver Officially Available for Ubuntu, Kubuntu,…[FIX] Error ‘No Such Partition - Grub Rescue’How to: Create an Ubuntu Bootable USB on Mac, Windows or UbuntuUbuntu 16.04.5 LTS Released on Heels of Ubuntu 18.04 LTS, Bundles All Past…